
Before we get into the tutorial, if you have a project and are trying to visualize your Elasticsearch data, take a look at our Elasticsearch Analytics page. You can also set up a 15-minute call with a member of our team to see if Knowi may be a good BI solution for your project.
Table of Contents
Introduction
This post is an end-to-end tutorial Elasticsearch analytics using Knowi. With Knowi you can natively connect to data in your Elasticsearch cluster. From there, we’ll show you how to create visualizations, perform joins across multiple indexes, and use Knowi’s Search-Based Analytics feature (also sometimes called natural language querying) to ask questions of your data and glean insights.
Creating Your First Visualization
In this section, we’ll step through using the Knowi UI to connect to our Elasticsearch cluster in the cloud to visualize and analyze data from it.
Sign up for a free Knowi account here and let’s get started!
Connecting to Elasticsearch
After logging in to Knowi, we’ll start by connecting to our Elasticsearch cluster hosted on the Elastic Cloud Service. Knowi also provides native integration to over 30 different data sources including SQL, NoSQL, REST APIs, data warehouses, and flat files.
Steps:
- From the Playground dashboard, select “Datasources” on the left-hand side panel then click “New Datasource”
- Select Elasticsearch from the list of data sources
- Once on the New Datasource page, start by giving your data source a name
- Enter your Elasticsearch credentials including the Endpoint URL and deployment username and password
- Choose your Elasticsearch version (Version 5+ by default)
- Click “Test Connection” to confirm successful connection to the Elasticsearch cluster
- Hit “Save”
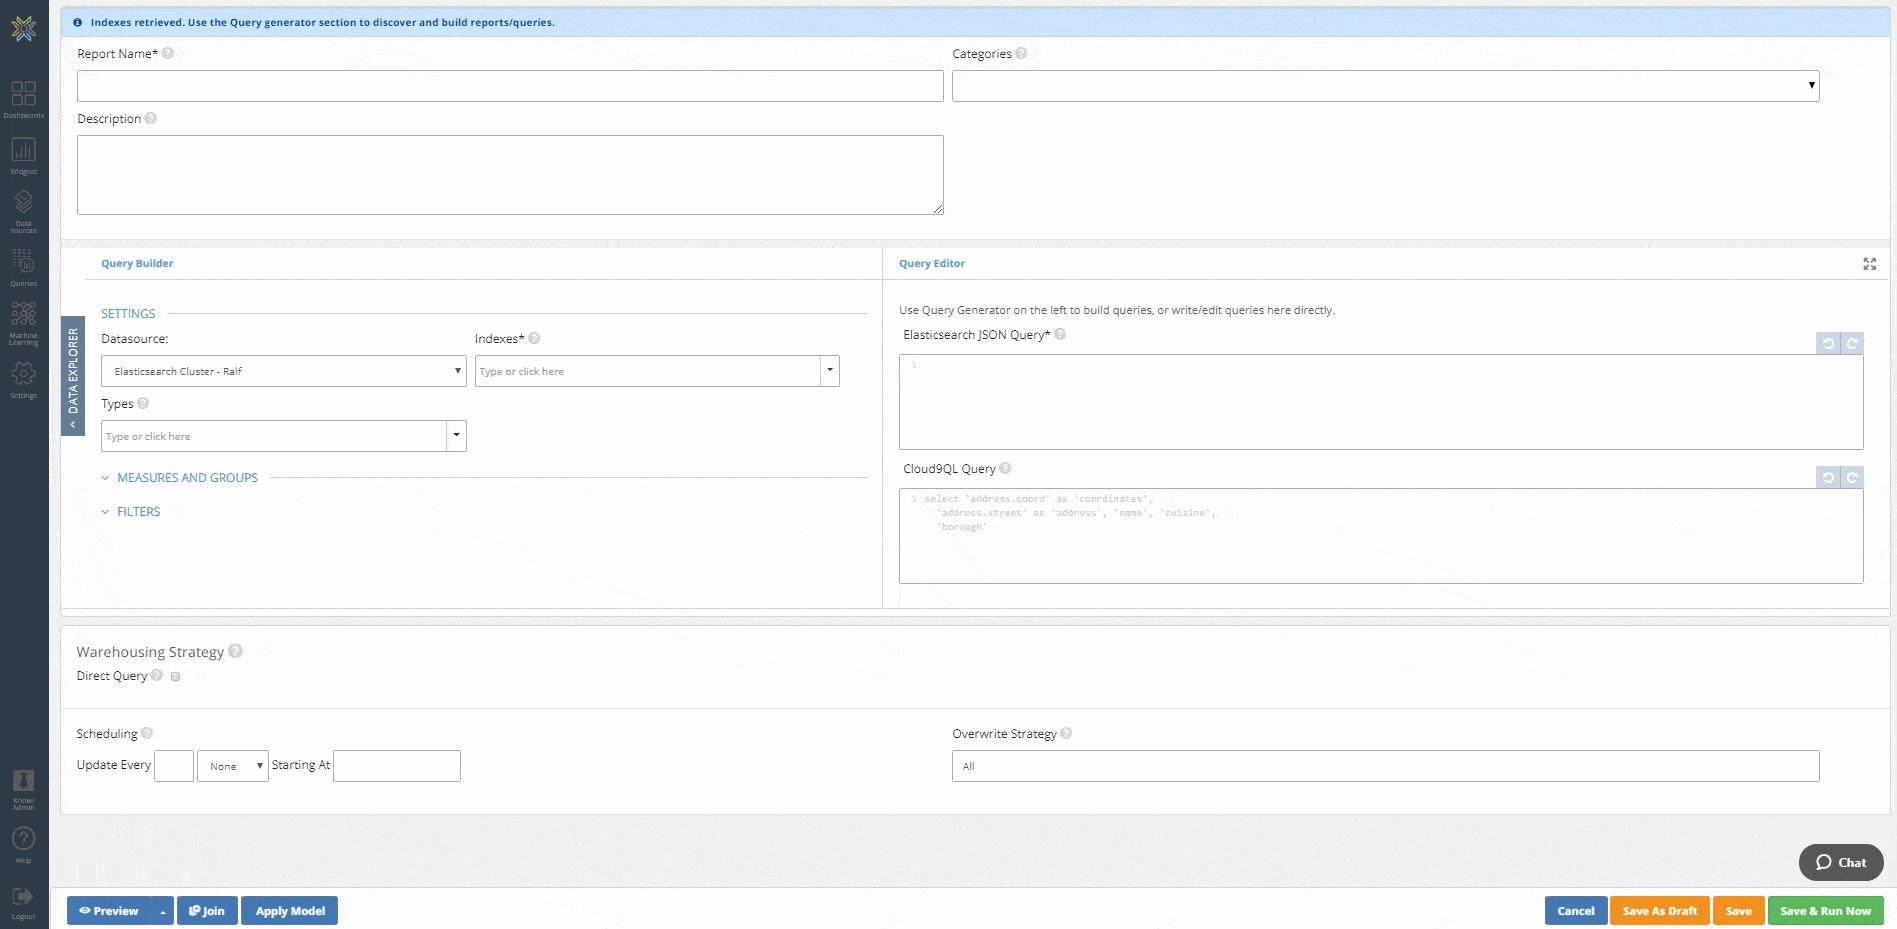
Writing Your First Query
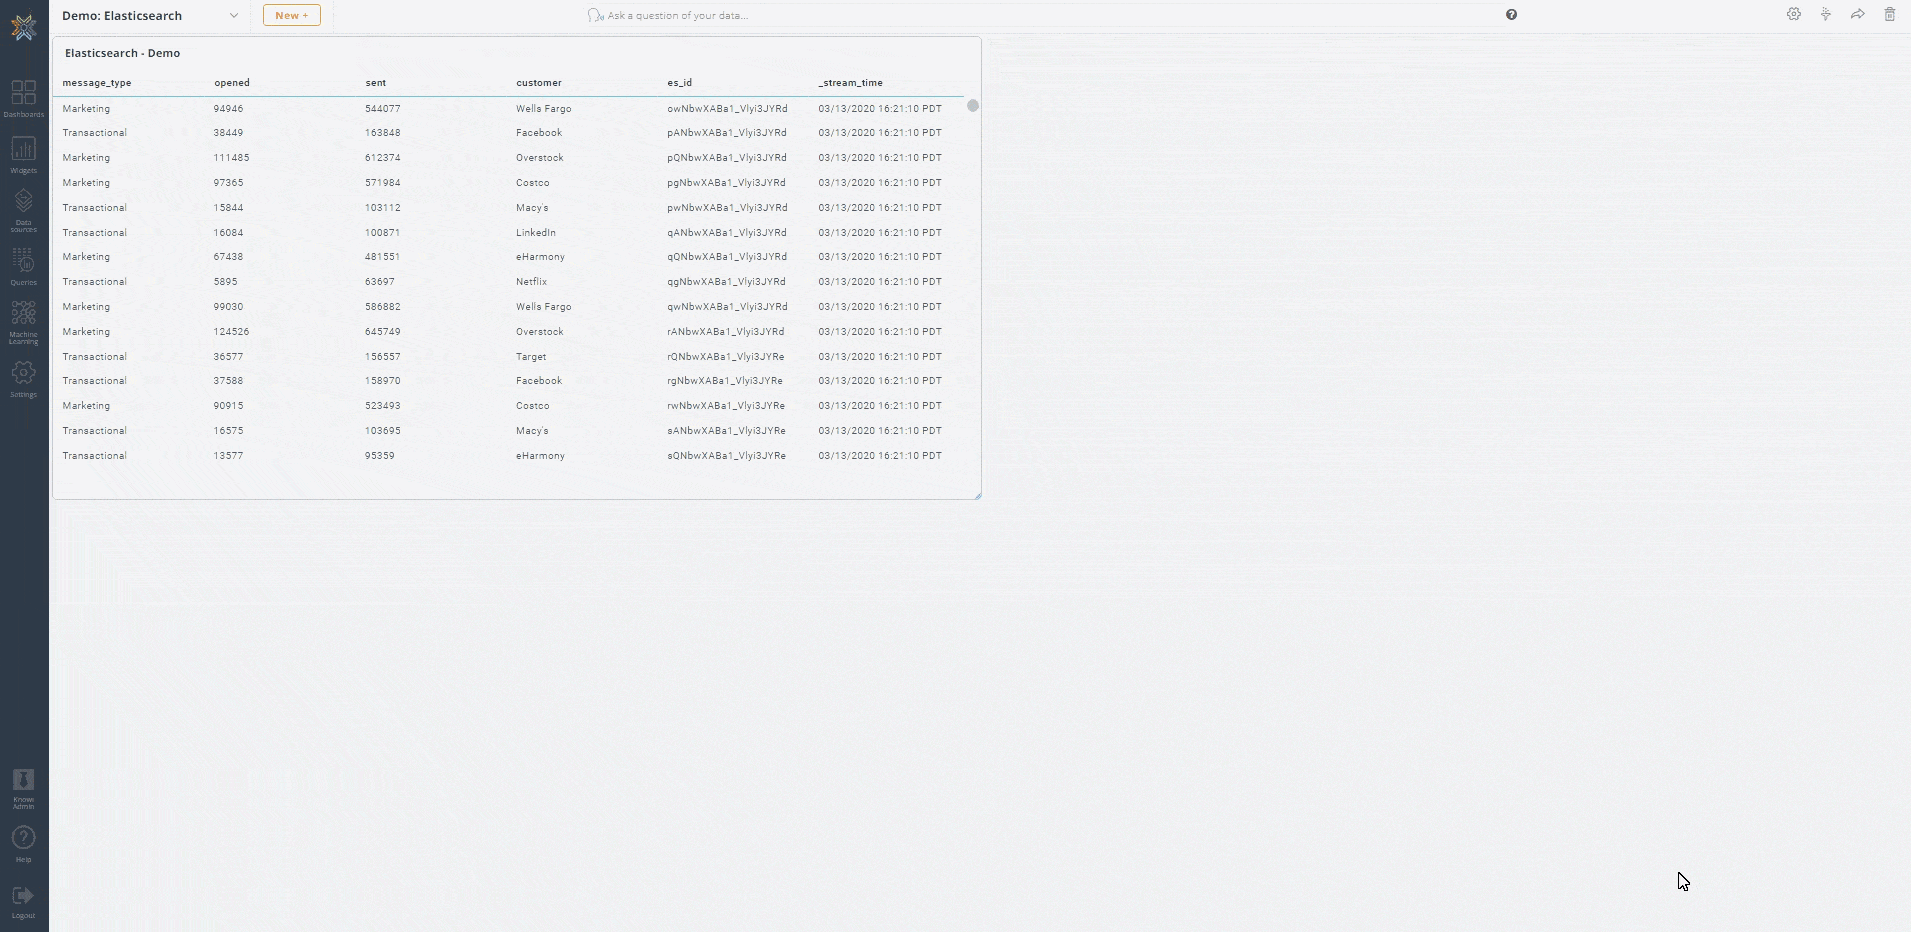
After connecting to your Elasticsearch cluster, Knowi automatically pulls a list of your indexes along with field samples. You have the option to auto-generate queries using the UI or write them directly in the Query Editor. In this example, we’ll select the sendingActivity index that pertains to an email sending campaign and choose the fields we want to analyze using the Query Builder.
Steps:
- Open the Query Generator by clicking “Start Querying”
- In the “Indexes” drop-down menu, choose the sendingActivity index
- In the “Metrics” dropdown, select the fields customer, message_type, sent, and opened
- Notice that in the Query Editor to the right, a native Elasticsearch JSON Query is being auto-generated
- If you already knew the query you needed, you could’ve pasted or written it directly
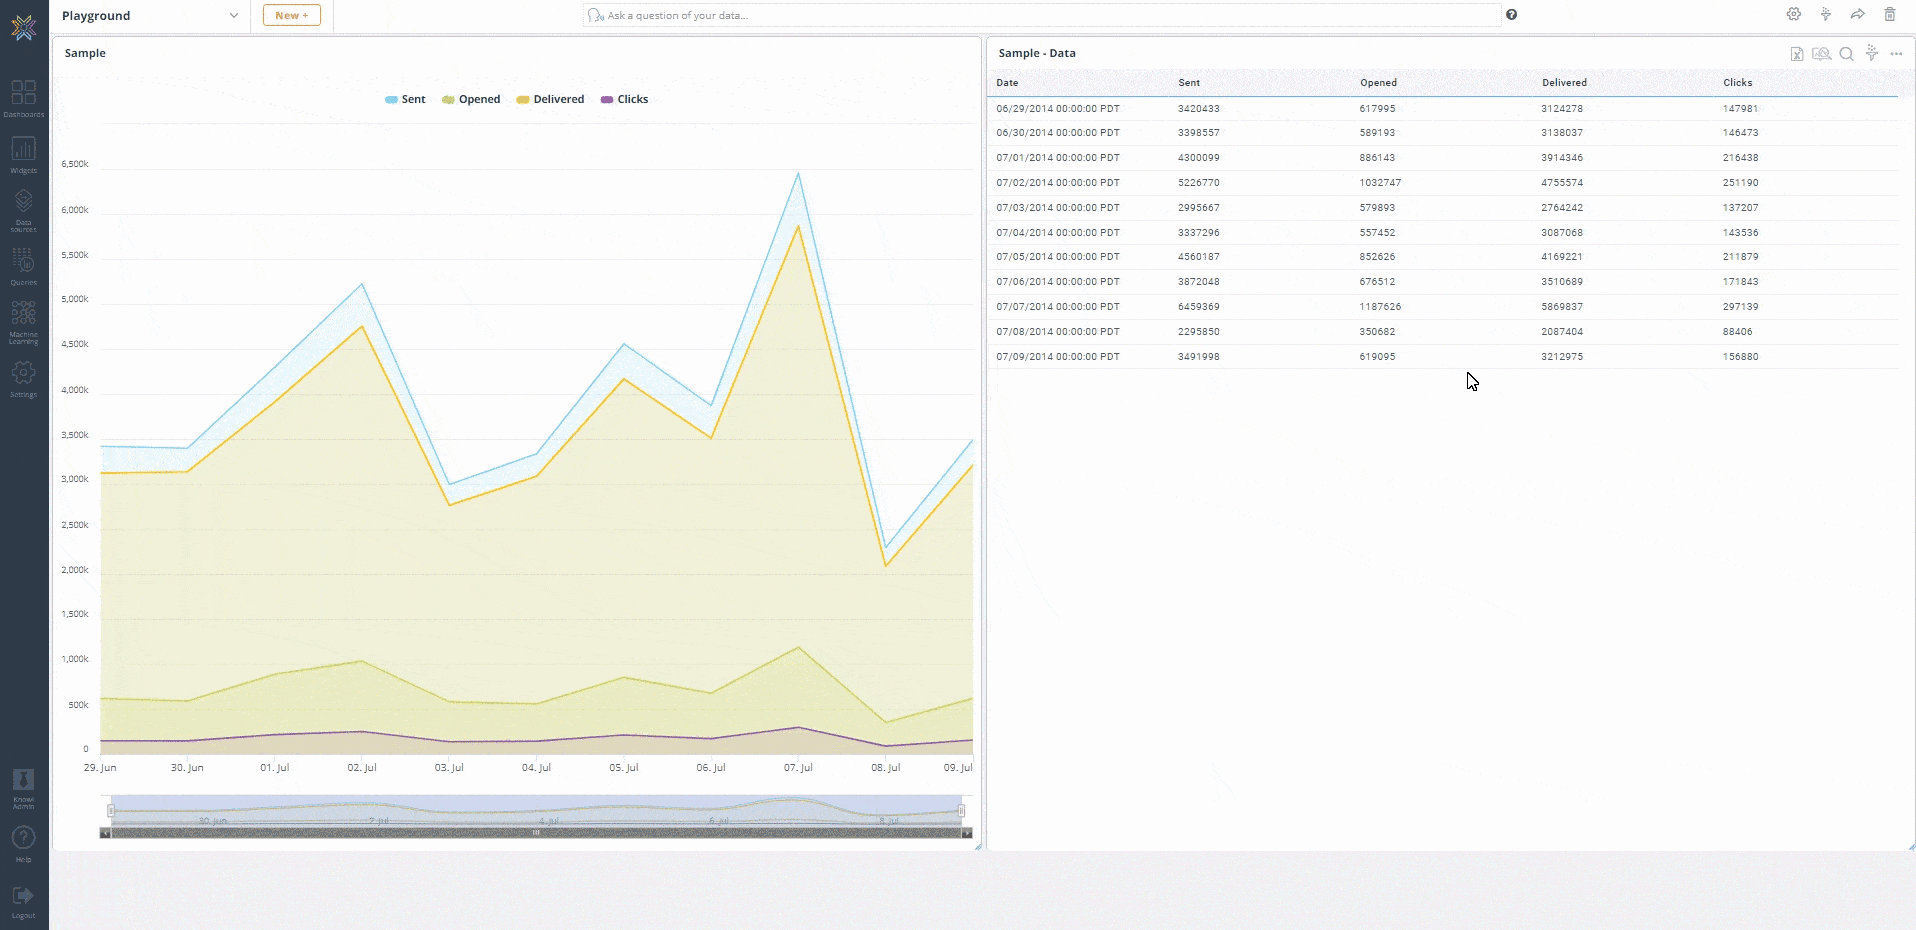
- Click “Preview” to instantly preview the results, which will be returned in tabular format
- After previewing the results, give your query a name then hit “Save & Run Now”
Creating Your First Visualization
Once the query is saved, Knowi creates a “Virtual Dataset” from the query results. This dataset will be the foundation for most of what you’ll do in Knowi, like creating visualizations, adding them to dashboards, and much more.
For this exercise, we want to visualize for each customer, the total number of sent emails that were either marketing or transactional message types. To do this, first create a new dashboard. Now add the dataset (widget) we just created to it, select the fields to visualize, and create a stacked column chart.
Steps:
- On the left-hand side panel, click “Dashboards”.
- Hit the “+” icon to create a new dashboard and give it a name then click “OK”.
- Drag the widget/report you previously created into the dashboard. By default, it will be in grid form.
4. On the top-right corner of the widget, click the “More Settings” icon then select “Analyze”.
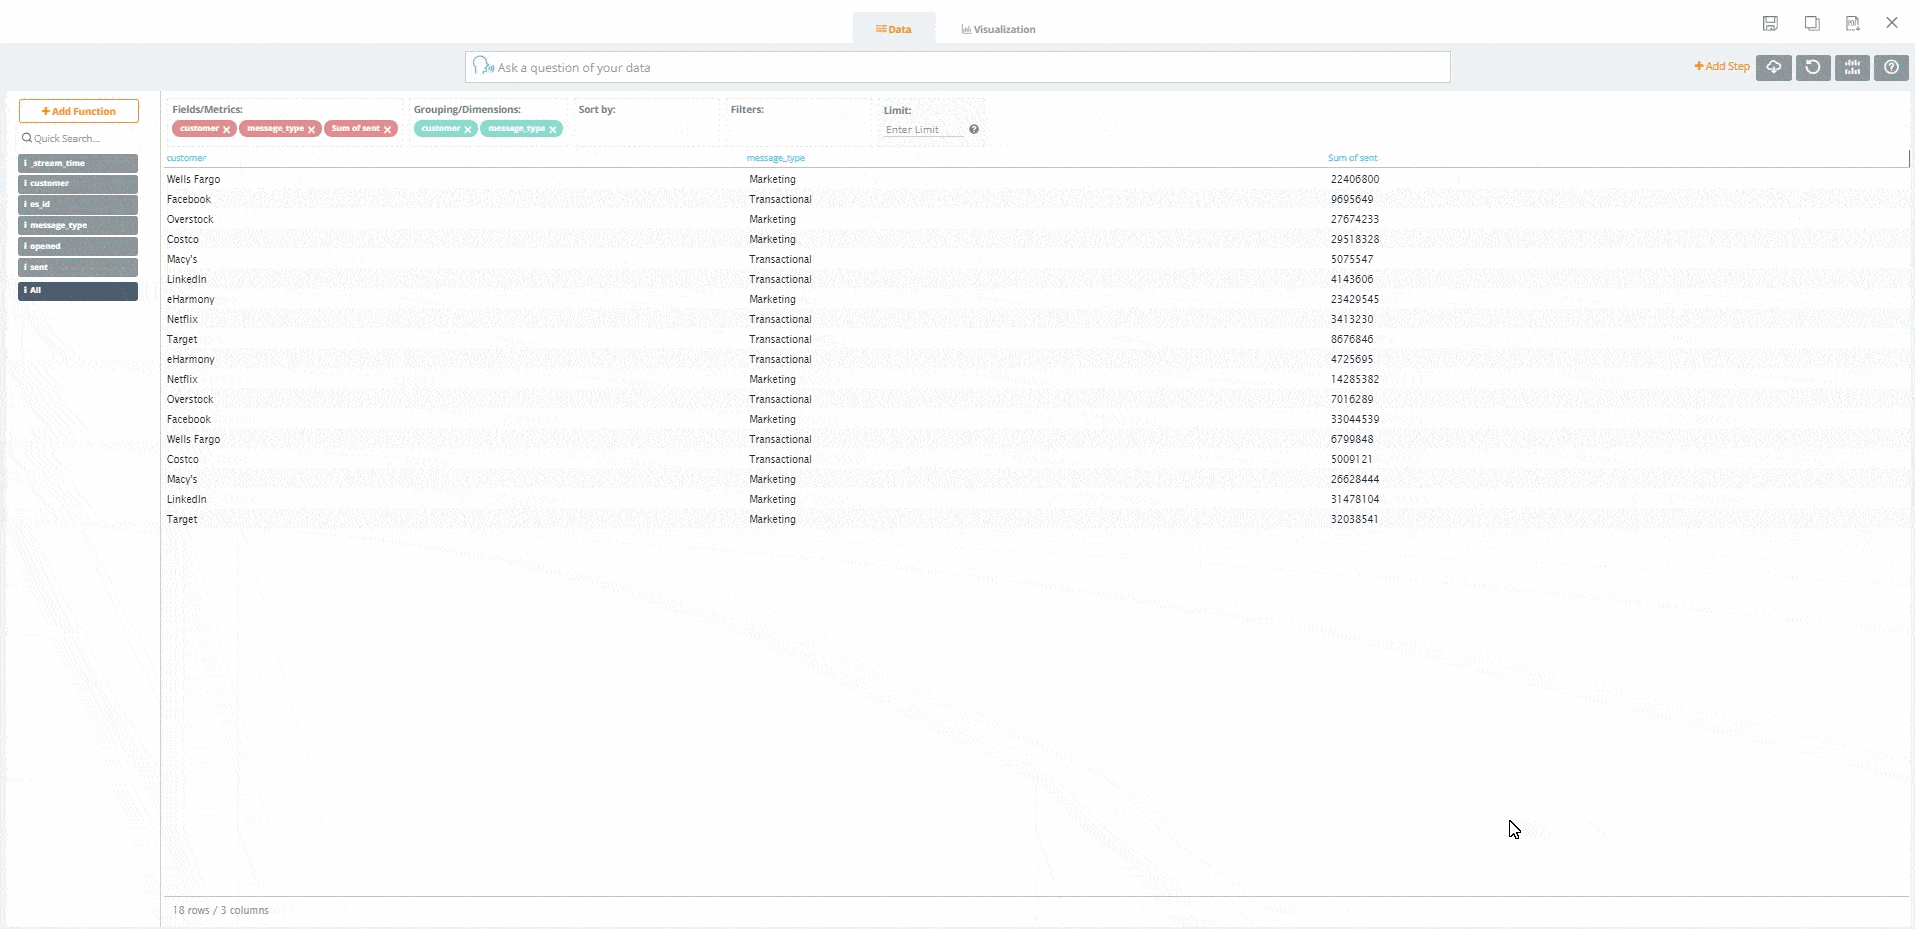
5. In the following screen drag customer and message_type to the “Groupings/Dimensions” section.
6. Drag sent to the “Fields/Metrics” section. In the “Operation” dropdown, select “Sum”.
Notice that for Wells Fargo (first row), there were 22,406,800 total marketing messages sent.
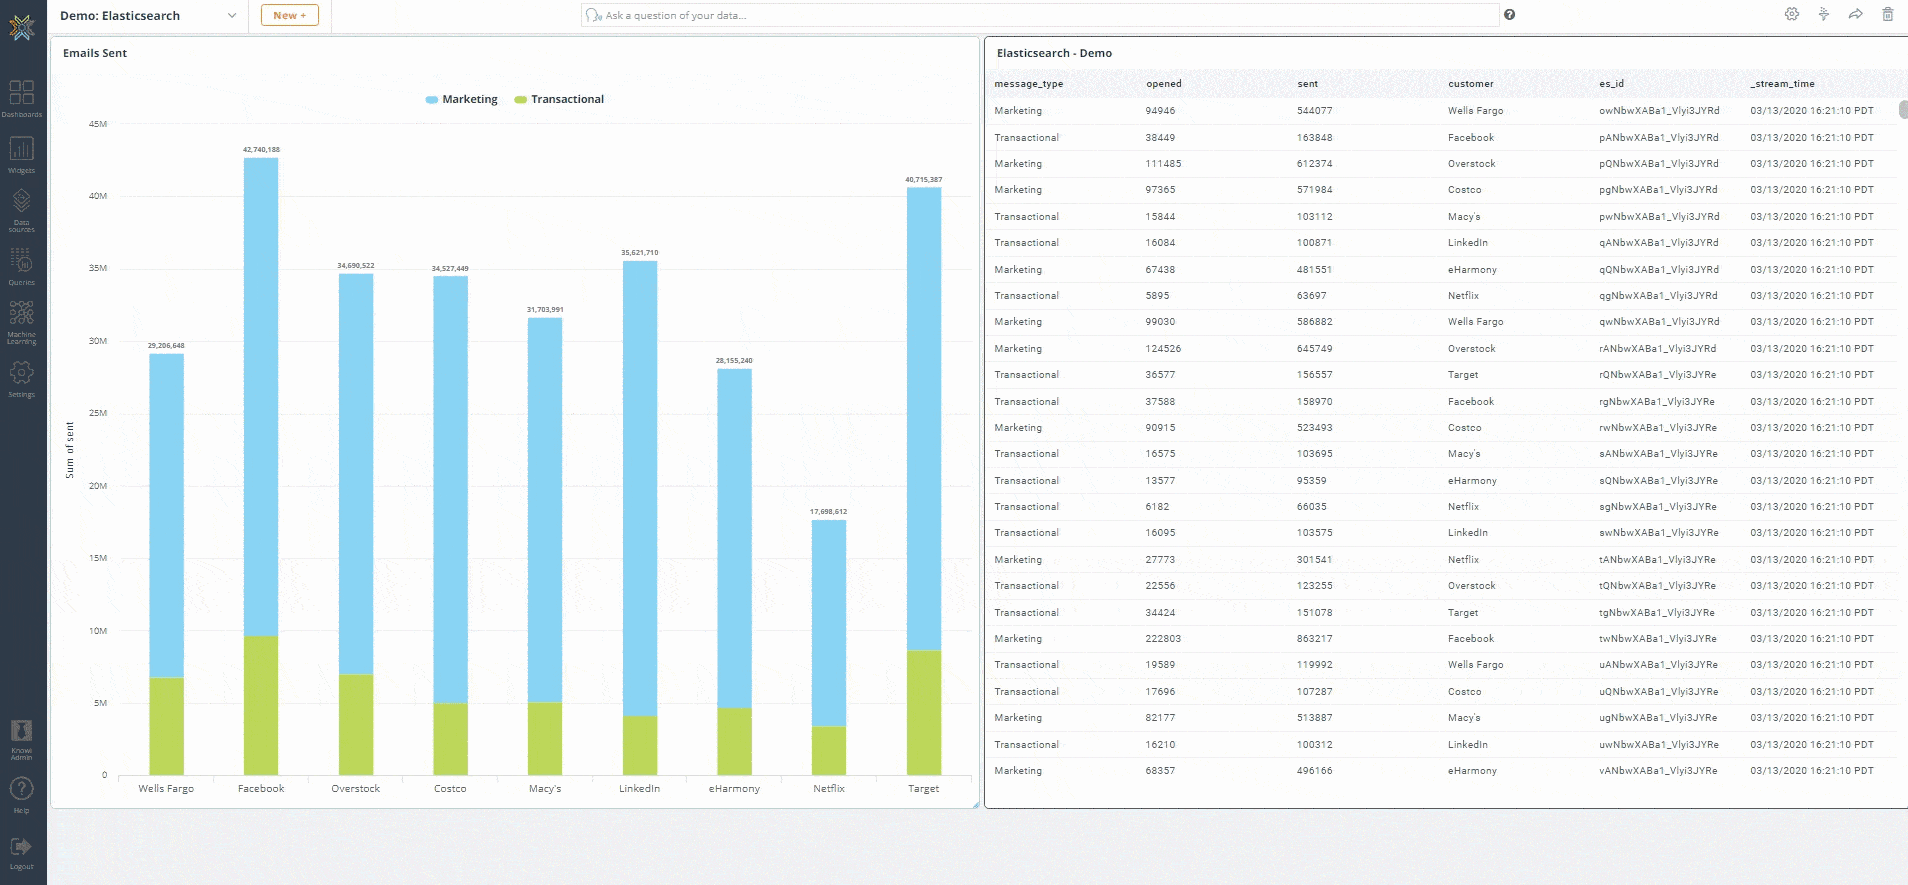
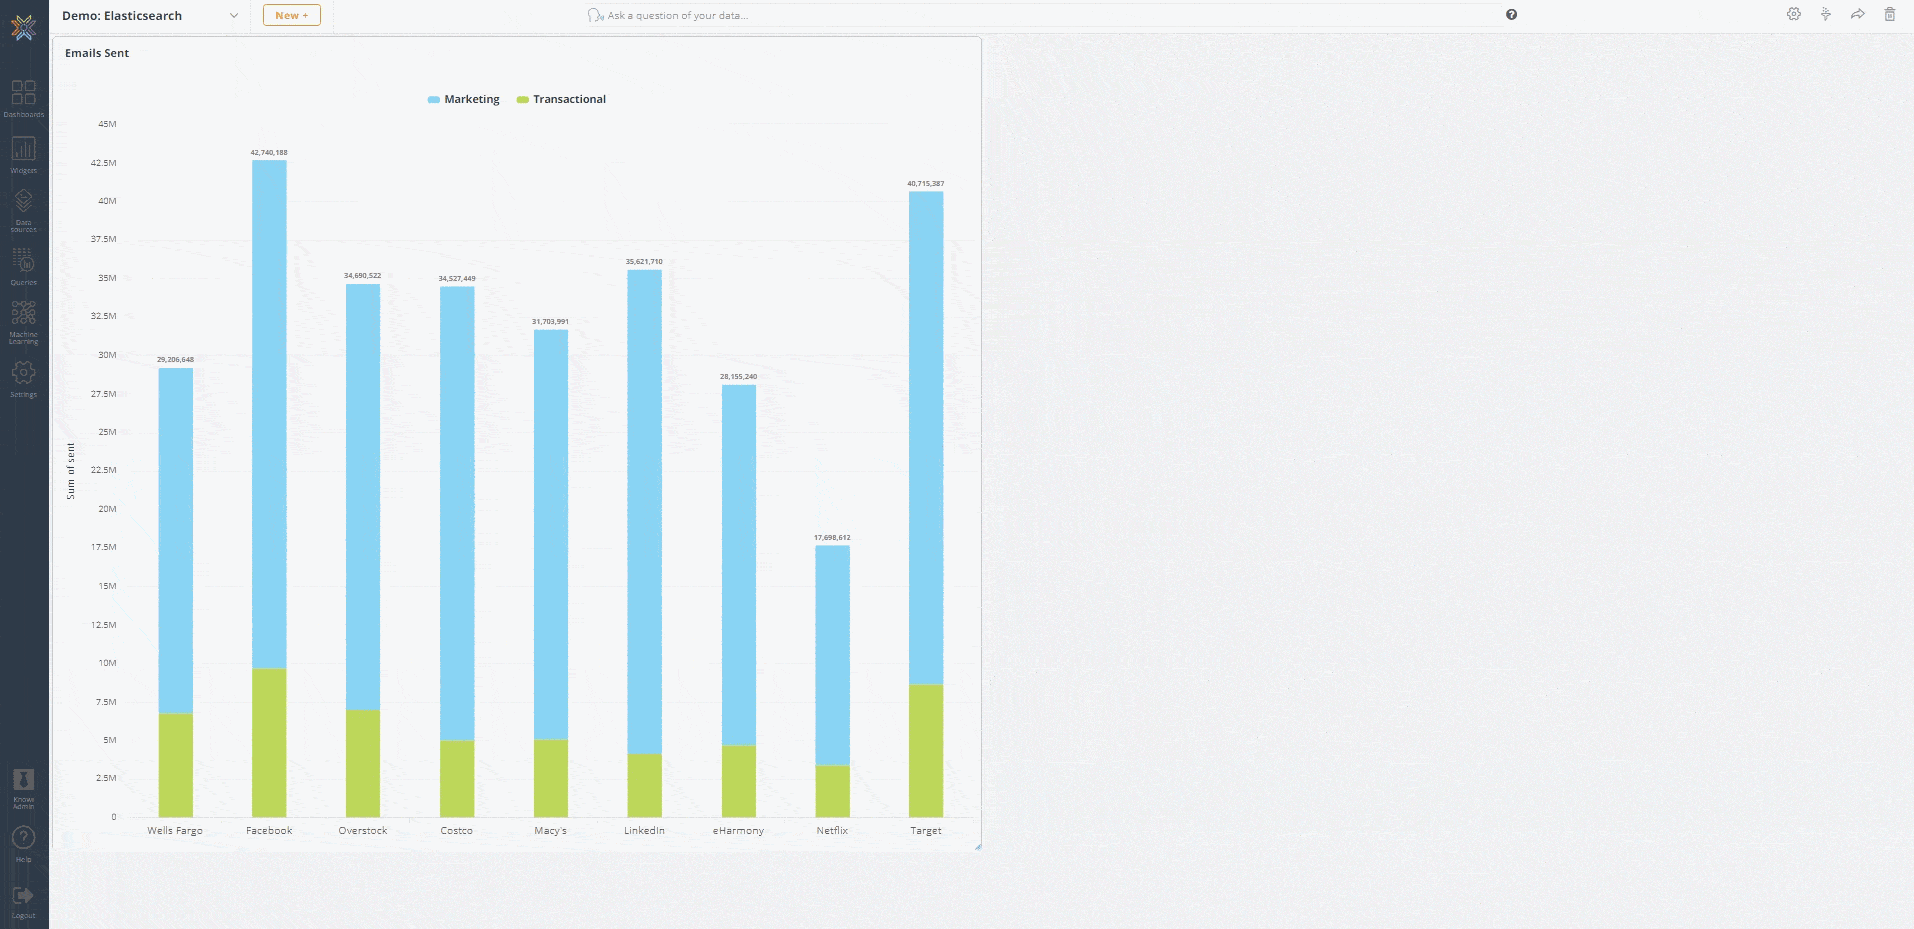
7. At the top of the screen, click the “Visualization” tab which takes you to the visualization settings screen. We want to create a stacked column chart with customer in the x-axis and sum of sent in the y-axis.
8. In the “Settings” section under the “Visualization Type” dropdown, select “Stacked Column”.
9. In the “Options” section under the “Grouping/Legend” dropdown, select message_type. We can now visualize the total number of emails by message type for each customer.
10. Hit the “Clone” icon on the top right to create a new widget derived from the original. This allows us to keep the original widget as is while having another version that we can freely change.
11. Give the cloned widget a name, then add it to the dashboard.
And there you have it! In just a few simple steps, you have created your first visualization from your Elasticsearch data.
Drilldowns
So let’s say we only want the bar chart displayed on the dashboard, but want the ability to see details for a given customer by clicking on the chart? That’s where drilldowns come in handy.
Drilldowns enable powerful point and click actions from one widget into another widget. Data from the parent widget can be used as keys into the drilldown widget to filter the data specifically for the point selected. Let’s try it out!
How to create a drilldowns
- Remove the original grid chart widget from the dashboard.
- On the top-right corner of the bar chart widget, click the “More Settings” icon then select “Drilldowns”. The drilldown menu box will appear.
- Under the “Drilldown type” dropdown, select “Widget”.
- For “Drill into”, select the name of the widget you want to drill into.
- For “Optional Drilldown Filters” select “customer” = “customer”.
- Hit “Save”.
- In the bar chart, click on any of the bars representing each customer (i.e. Wells Fargo).
- By clicking on Wells Fargo, we were able to “drill down” in the original grid chart, but this time only showing details for the customer Wells Fargo.
As you can see, Drilldowns provide a way to navigate, visualize, and bring an interactive dimension to your Elasticsearch data.
Multi-Index Joins
Being part of the “ELK Stack” it’s no surprise Kibana is considered the default visualization tool for Elasticsearch. However, its drawback is that each visualization can only work against a single index. So if you have indices with strictly different data, you’ll have to create separate visualizations for each.
Knowi provides a solution for this, as it allows you to join your Elasticsearch data across multiple indexes and blend it with other SQL/NoSQL/REST-API data sources, then create visualizations from that data with a user-friendly UI. Let’s give it a try.
In the following steps, we’ll join our initial sending_activity index with another index in our cluster with customer-specific information to create a new combined virtual dataset that can be used for downstream analytics and visualizations.
Joining Your Indexes
Since we’ve already created a query for the sending_activity index, let’s go back and edit it to add a join to our second index sending_activity_customer.
Steps:
- From the left-hand side panel of the Knowi UI, select “Queries”.
- Look for the “Elasticsearch – Demo” query we ran earlier and click the “Edit” icon.
- In our first query, let’s add the date and conversions field to the metrics.
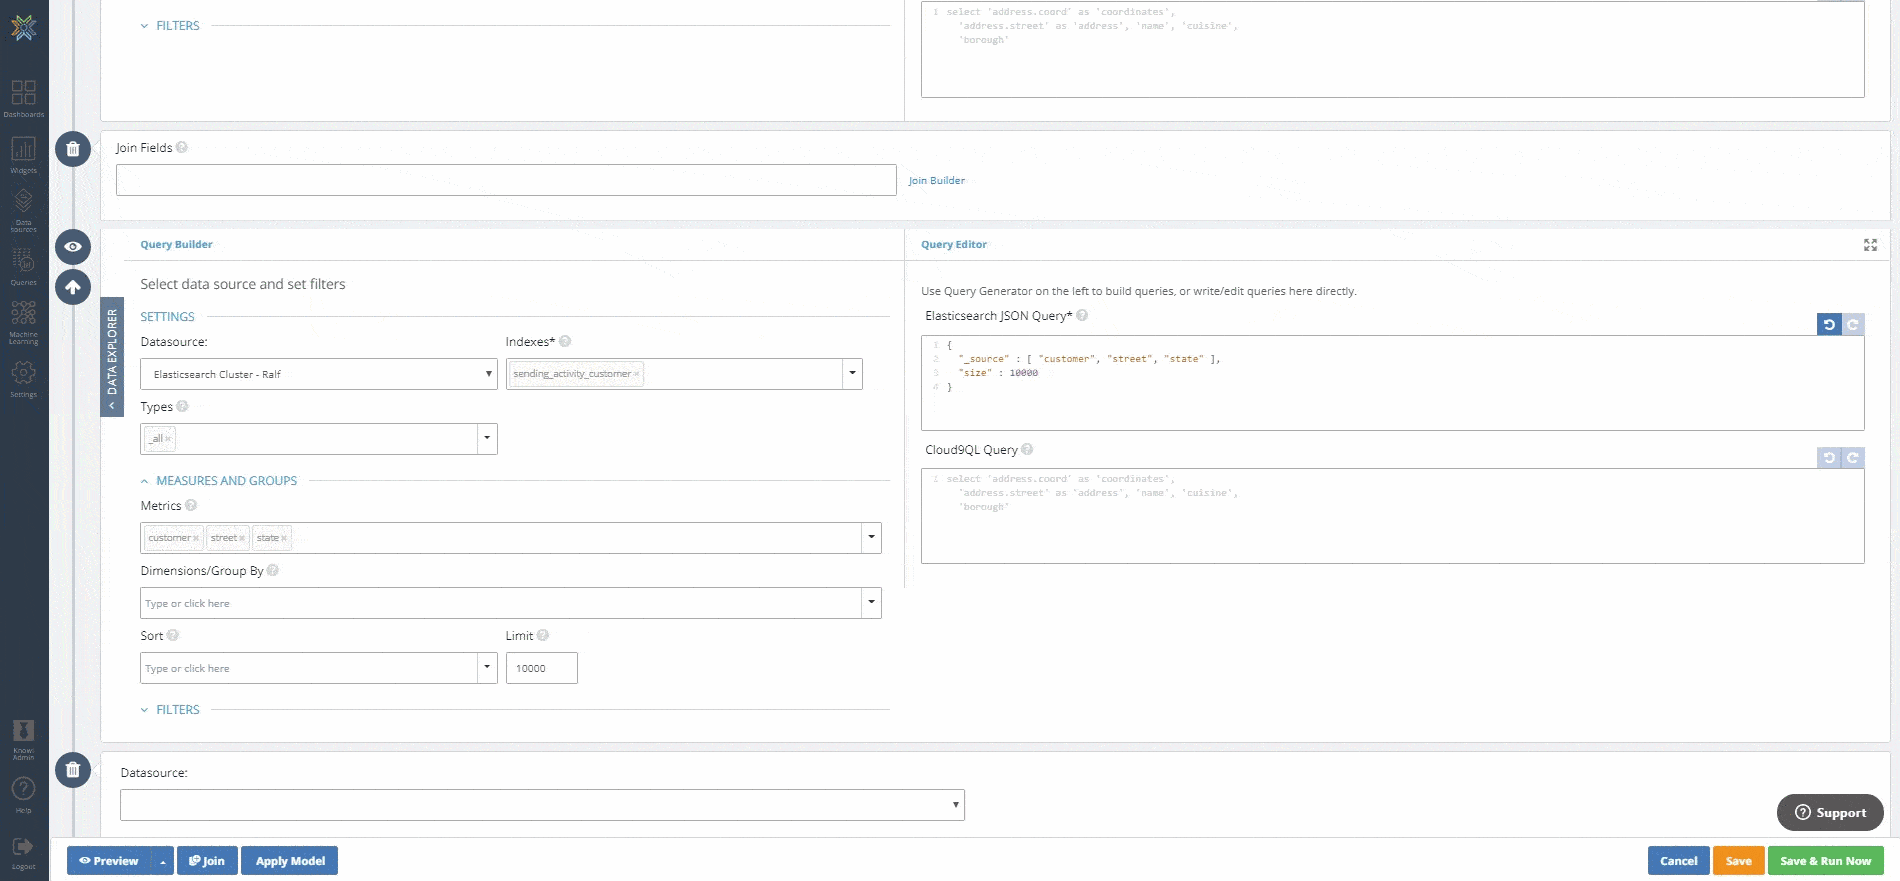
- Click the “Join” button on the lower-left side of the screen. Select your Elasticsearch data source from the dropdown.
- This will populate the “Join Fields” section and another “Query Builder” and “Query Editor” sections below the first one.
- In the “Indexes” dropdown menu, choose the sending_activity_customer index.
- In the “Metrics” dropdown menu, select your key field customer, followed by the street and state fields.
- Notice that this index contains mostly customer information-related fields.
So far, we have the query from our first index that gives us the customer, the type of email sent, and how many were sent, opened, and converted. In our second index query, we get address information from the same customers. Now, it’s time to join these two indexes together.
8. In the “Join Fields” section click “Join Builder”. Note that you can also type in the join free-hand in the text bar.
9. Once the fields are retrieved, select “INNER JOIN” as the join type. Under “Left Field”(sending_activity index side), select the key field customer. Under “Right Field”(sending_activity_customer index side), you’ll also select the key field customer then save.
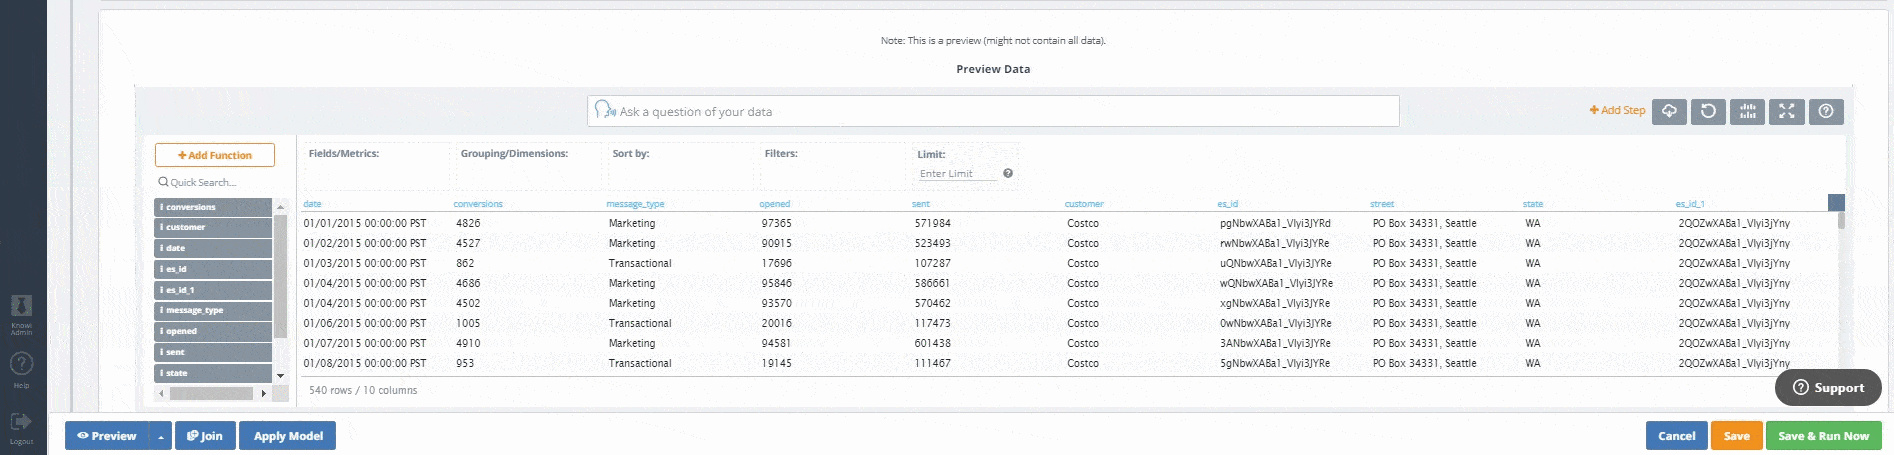
10. Now, let’s click “Preview” to see what the combined dataset looks like.
In the new combined dataset, we have customer, message_type, sent, opened, conversions, and date fields from our first index and the street and state fields form our second index, joined on the key field customer. As you can see, we were able to run the queries from each side of the join then combine them to get the results. We can now use this combined dataset to create all sorts of reports and visualizations.
Search-Based Analytics & Self-Service Analytics
Knowi’s search-based analytics is a powerful Google-search-like feature, that allows you to type in questions from your data in plain English and get back data and answers. This is especially useful for non-technical end-users, allowing them to gain insights from the data even without prior knowledge of the underlying data structure or query syntax of the data source.
In the following steps, we’ll use a brief example of using search-based analytics to ask questions from the blended email sending activity dataset we created in the previous section.
Search-Based Analytics Example
- Let’s find ask our data to find out the “maximum emails sent”:
- Notice that as you type, Knowi auto-suggest the question you are asking
- When the results are returned, you can check to confirm that the ‘Max’ operation was performed on the sent field
- Now, let’s find out where each of the customers are located by asking “street and state by customer”:
- Notice that it automatically knew to group the results by customer then return the address for each.

- Finally, let’s take things a little further and find out what our conversion rate it is by customer on a weekly basis:
- Notice that it automatically knew to apply the “Week” operation on the date field, then grouped the results by customer and by week.

As we’ve seen, by simply typing in questions in plain English, we were able to get answers back instantly from our combined Email Sending Activity dataset. You also have the option to take these results and create new widgets that can be added to your dashboard.
Summary
In summary, we used Knowi to connect and write native queries on data stored in our Elasticsearch cluster then create visualizations from it. We performed joins on multiple indexes in our cluster and used the search-based analytics feature to ask questions from our data without the need for prior knowledge of the underlying query language.
If you want to see more of what you can do with Knowi and Elasticsearch, check out our Elasticsearch analytics demo playground.