TL;DR
Knowi offers native integration with Apache Cassandra (and DataStax Astra) to enable direct querying, blending with other SQL/NoSQL/REST sources, and instant visualization without ETL.
- Setup: Connect Cassandra in minutes without drivers.
- Querying: Use drag-and-drop Query Builder or write CQL directly.
- Joins: Seamlessly blend Cassandra data with other sources like MySQL.
- Post-Processing: Use Cloud9QL for additional calculations and transformations.
- Visualization: Build interactive dashboards with charts, drilldowns, and filters.
- NLP Search: Ask questions in plain English to generate instant insights and visualizations.
- AI analytics:
Table of Contents
- Introduction
- Connecting to Cassandra
- Writing Your First Query
- Joining Across Cassandra and other Data Sources
- Post-Processing With Cloud9QL
- Creating Your First Visualization for Cassandra data
- Adding Drilldowns
- Search-Based Analytics & Self-Service Analytics
- AI Analytics with Knowi
- Summary
- Explore more about Cassandra
- Frequently Asked Questions
- What is Knowi’s advantage over traditional BI tools for Cassandra analytics?
- Do I need to move my Cassandra data into a separate warehouse before analyzing it in Knowi?
- Can I blend Cassandra data with data from other sources?
- What query options are available for Cassandra in Knowi?
- Does Knowi support Cassandra’s complex data types?
- How do visualizations work with Cassandra data in Knowi?
- Can I drill down into Cassandra dashboard data?
- Does Knowi offer natural language querying for Cassandra?
- What AI features does Knowi offer for Cassandra analytics?
- Is Knowi compatible with DataStax Astra?
- Can I embed Cassandra analytics into my own application?
- What’s the setup time to connect Cassandra to Knowi?
Introduction
Apache Cassandra is a highly scalable, high-performance, distributed database. It is designed to handle large amounts of data across many commodity servers, providing high availability with no single point of failure. The speed, scalability, and resiliency of Cassandra make it ideal for storing and querying large amounts of data–especially high throughput data. It’s no wonder it serves as the backbone for streaming giant Netflix and is often used in IoT analytics and real-time data analytics use cases.
Knowi is an analytics platform that natively integrates with Cassandra so you can leverage all the query power of Cassandra to visualize large amounts of data rapidly. Knowi allows you to query Cassandra directly using CQL, or use a drag-and-drop interface to build queries quickly without prior knowledge of the query syntax. Knowi also natively integrates with over 60+ SQL/NoSQL/REST-API data sources, allowing you to join your Cassandra data with any combination of these on the fly to create brand new datasets that can be used for downstream analytics. From there, you can choose from a host of visualizations options to create custom interactive dashboards, run ad-hoc analysis, ask questions from your data with a Google search-like analytics feature, apply built-in machine learning algorithms, and more.
For Datastax Analytics, Knowi’s native integration also extends to Datastax Astra, DataStax’s cloud-native database-as-a-service (DBaaS) built on Apache Cassandra.
This post will walk you through the steps of using Knowi for Cassandra analytics, including setting up connectivity to your Cassandra data source and create interactive visualizations from it. In this demonstration, we’ll be analyzing sample marketing data pertaining to an email sending campaign. Among the topics we’ll cover include:
- Connecting your Datastax Cassandra data source to Knowi
- Writing your first query
- Joining across multiple data sources
- Post-processing with Cloud9QL
- Creating your first visualization
- Adding Drilldowns
- Using Knowi’s search-based natural language processing (NLP)
Sign up for a free Knowi account here to get started.
Connecting to Cassandra
Knowi has broad native integration to other NoSQL, SQL, REST-API and JSON/CSV data sources. To get started, select your data source and configure the connection. Your data stays in the source so there are no ETL processes to build or ODBC drivers to install.
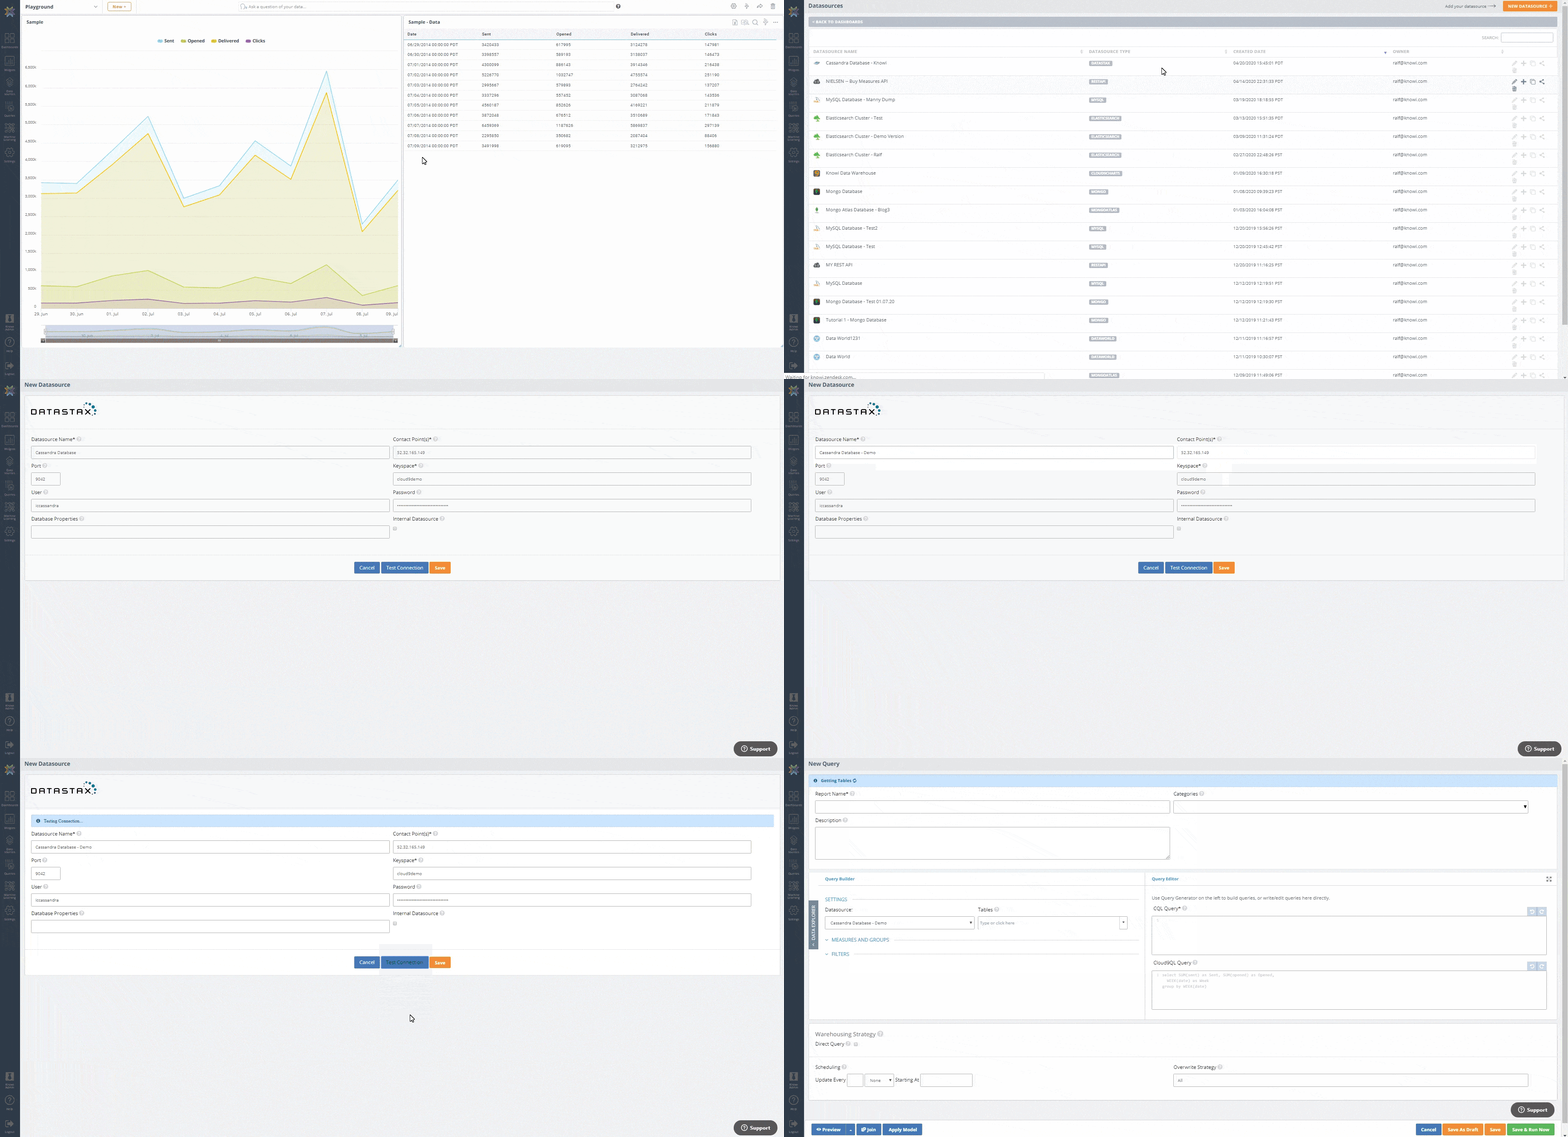
After logging in to Knowi, we’ll start by establishing a connection to your Datastax Cassandra data source.
Steps:
- From the Playground dashboard, select “Data sources” on the side panel menu
- Select Datastax from the list of data sources
- Enter your data source credentials and give your data source a name
- Test the connection to confirm successful connection to your data source
- Hit “Save” to start querying your Keyspace
Ready to start? Start our free trial– no credit card required
Writing Your First Query
Once connected to your Cassandra data source, Knowi auto-detects the tables, keys, and fields within. Knowi also supports Cassandra data types and collections (i.e. ascii, blob, counter) and collections (i.e. list, map, set). To start building your queries, Knowi gives you the option to auto-generate your queries using its drag and drop Query Builder via the UI. This is especially useful for users not as familiar with CQL. For more advanced CQL users, you also have the option to write your queries directly in the smart Query Editor, a versatile text editor specialized for editing code.
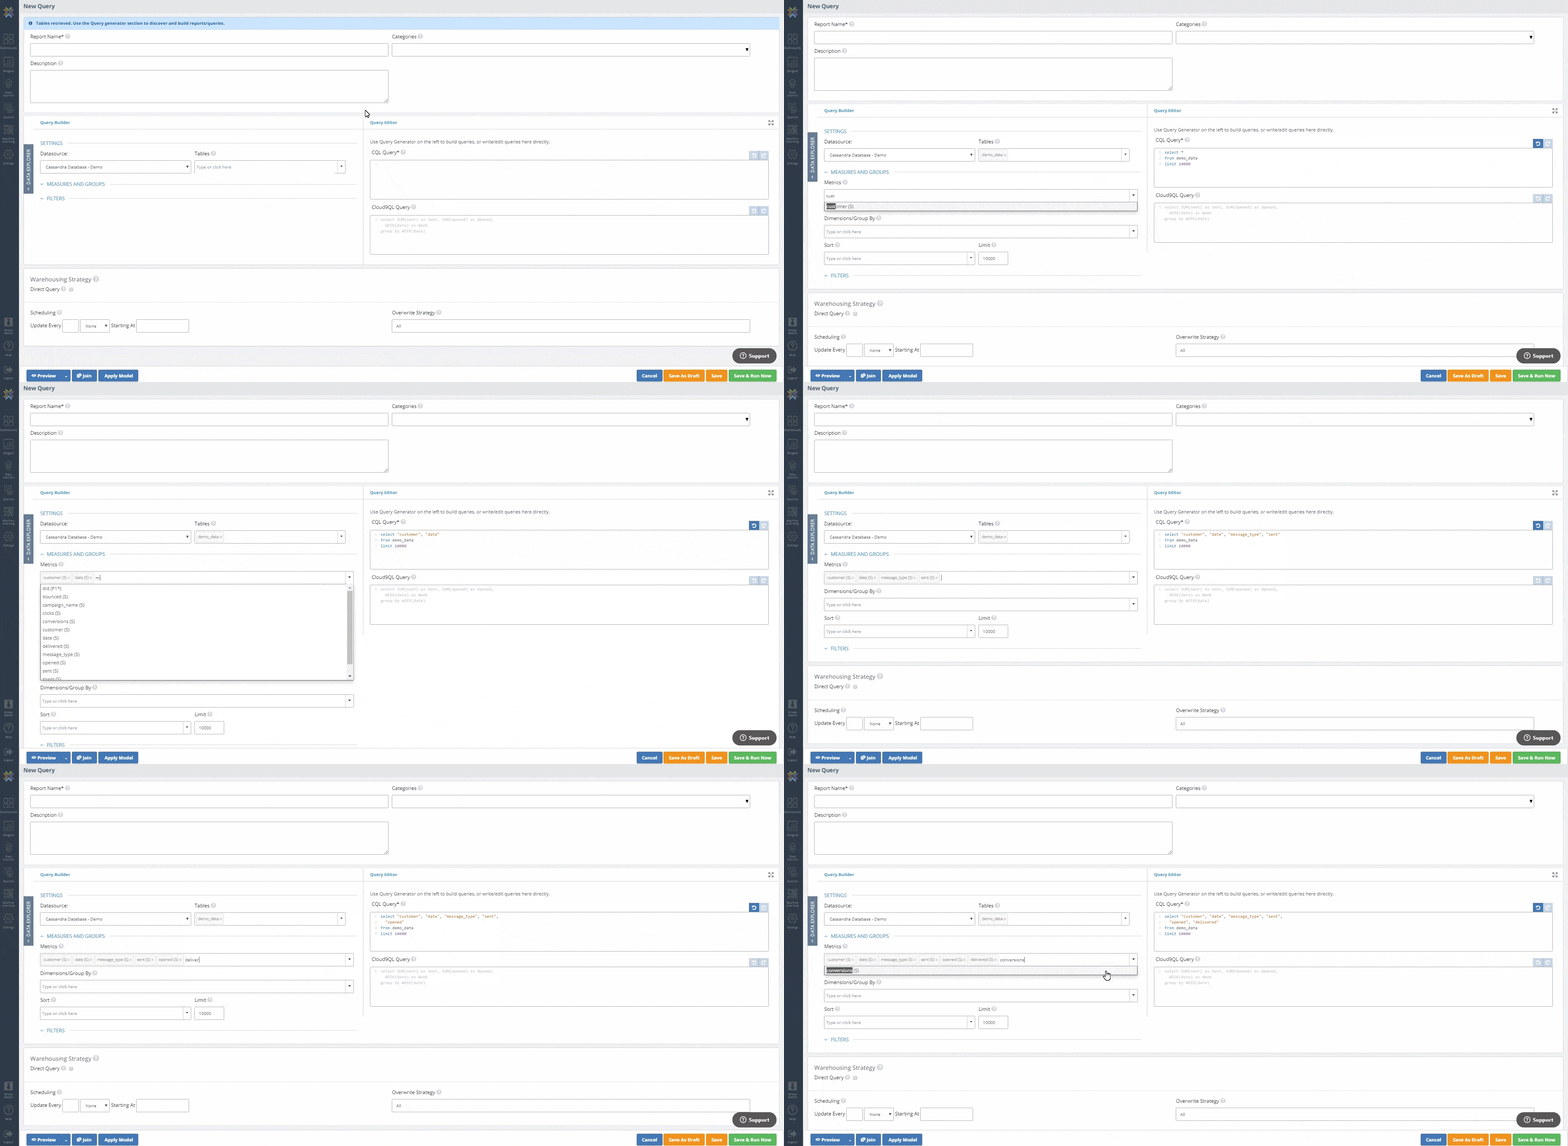
In this example, we’ll select the demo_data table (which contains email sending activity data) and select the fields we want to analyze from the auto-generated fields from the Query Builder.
Steps:
- In the “Edit Query” screen, navigate to the Query Builder section
- In the “Tables” drop-down menu, select the demo_data table
- In the “Metrics” drop-down menu, select the fields customer, date, message_type, sent, opened, delivered, and conversions
- Notice that in the Query Editor to the right, a native CQL query is being auto-generated
- If you already knew the query syntax, you could instead write or paste it in directly
- Click “Preview” to instantly preview the results, which will be returned in tabular format
- After previewing the results, give your query a name then hit “Save”
Joining Across Cassandra and other Data Sources
Knowi facilitates joins across multiple data sources to process, blend, and store combined results seamlessly. Traditionally, to perform lookups from one data source to another requires engineering efforts along with mapping storage for the results. Knowi enables you to join across the same or disparate SQL or NoSQL databases to stitch the data back together into a single result along with the ability to store and track it. All join types are supported, including INNER JOIN, LEFT OUTER JOIN, FULL OUTER JOIN, RIGHT OUTER JOIN, and LOOP JOIN.
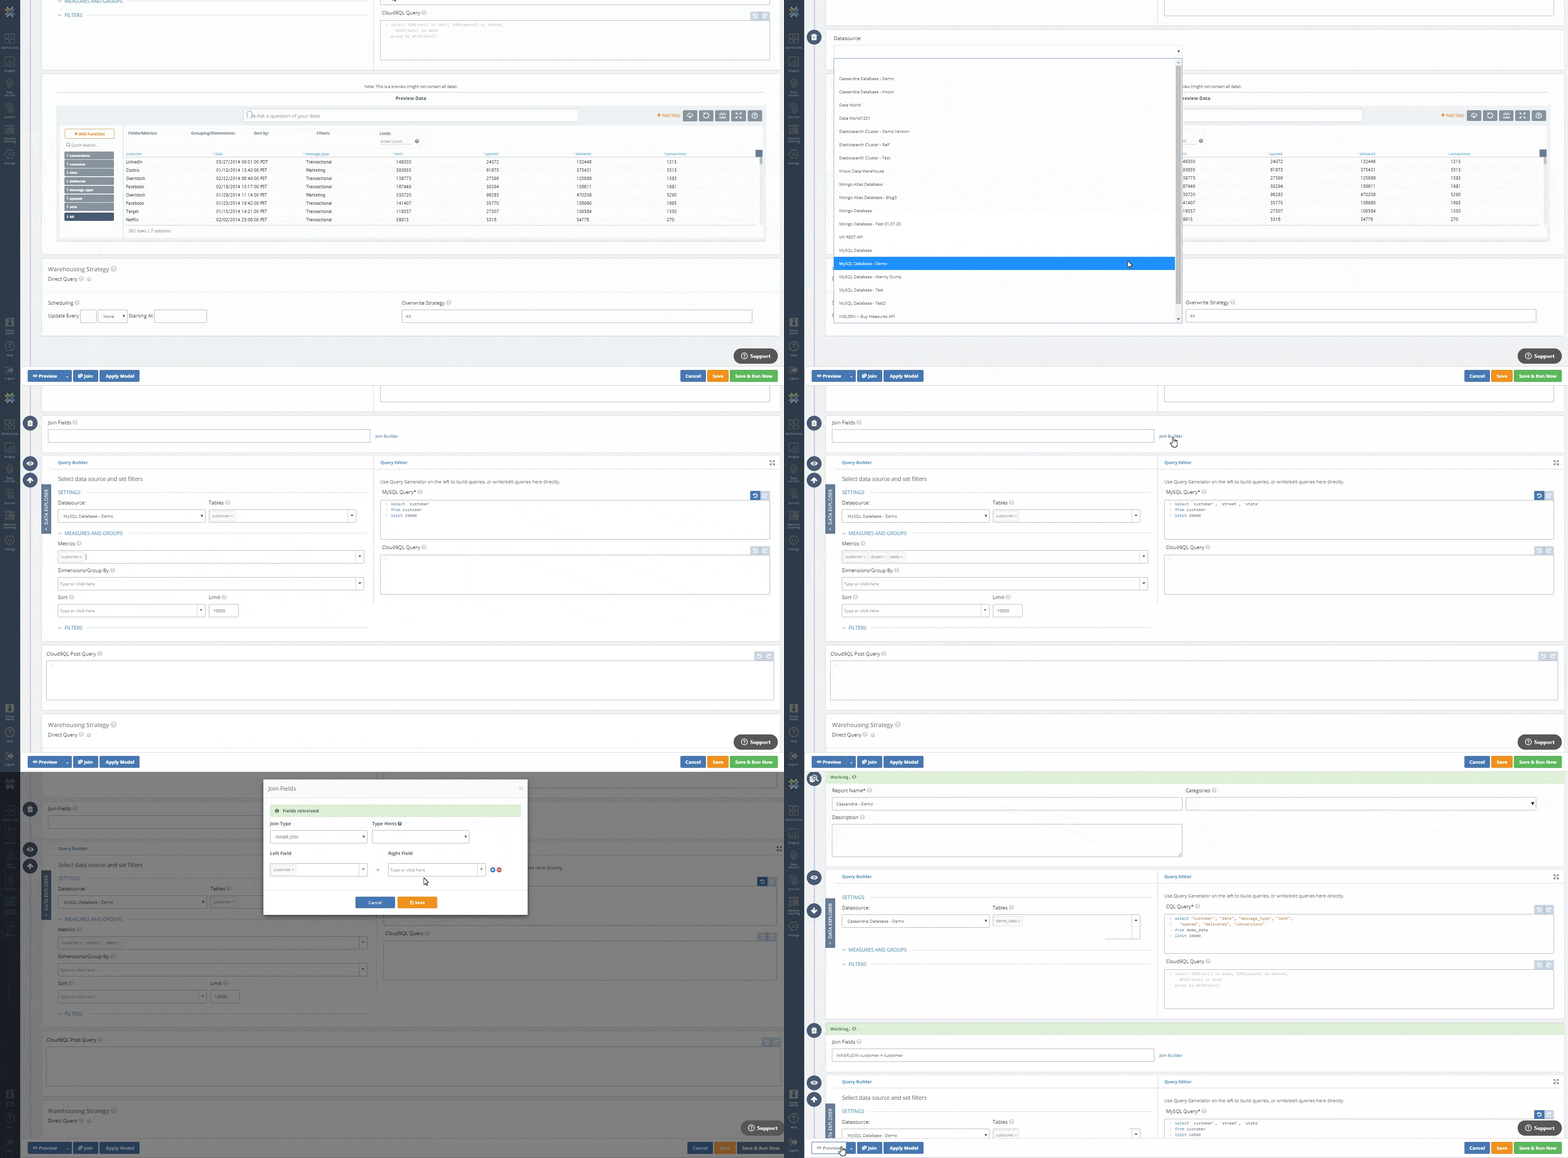
In this example, we’ll connect to another data source, a MySQL database that stores customer information. Once connected, we’ll perform a join against the MySQL database to pull customer addresses. We will then preview each section of the join, then do a final preview on the combined dataset.
Steps:
- Repeat the steps from the “Connecting to Cassandra” section, this time, select a MySQL database as the data source
- Accept the MySQL default credentials, test the connection, give it a name, then Save
- Return to your original Cassandra query and click “Join” near the bottom of the screen
- Select the MySQL data source you just saved as the data source
- This will populate the “Join Fields” section and another “Query Builder” and “Query Editor” sections below the first one
- In the “Tables” drop-down menu, select the customer table
- In the “Metrics” drop-down menu, select the fields customer, street, and state
- In the “Join Fields” section click “Join Builder”. Note that you can also type in the join free-hand in the text bar by entering “customer=customer”
- Once the fields are retrieved, select ‘INNER JOIN’ as the ‘Join Type. Under ‘Left Field’ (Cassandra side), select the key field customer. Under ‘Right Field’ (MySQL side), you’ll also select the key field customer then Save
- Optional — Use the Eye icon on the left-hand side of the page near each of the queries to preview the result of each join part separately
- Click “Preview’ to view the new blended dataset results
Post-Processing With Cloud9QL
Knowi also allows you to analyze and transform this new blended dataset using Cloud9QL, its proprietary SQL-like syntax that enables users to aggregate, manipulate, and calculate new data directly without the need for additional data prep tools. Cloud9QL is particularly useful for post-processing and transforming the returned data to complement native queries, generating alternative views from the same data within Know, and querying file-based data or data stores that have limited query support. Note that Cloud9QL is not a replacement for the underlying query but offers powerful analytics functions on the returned results.
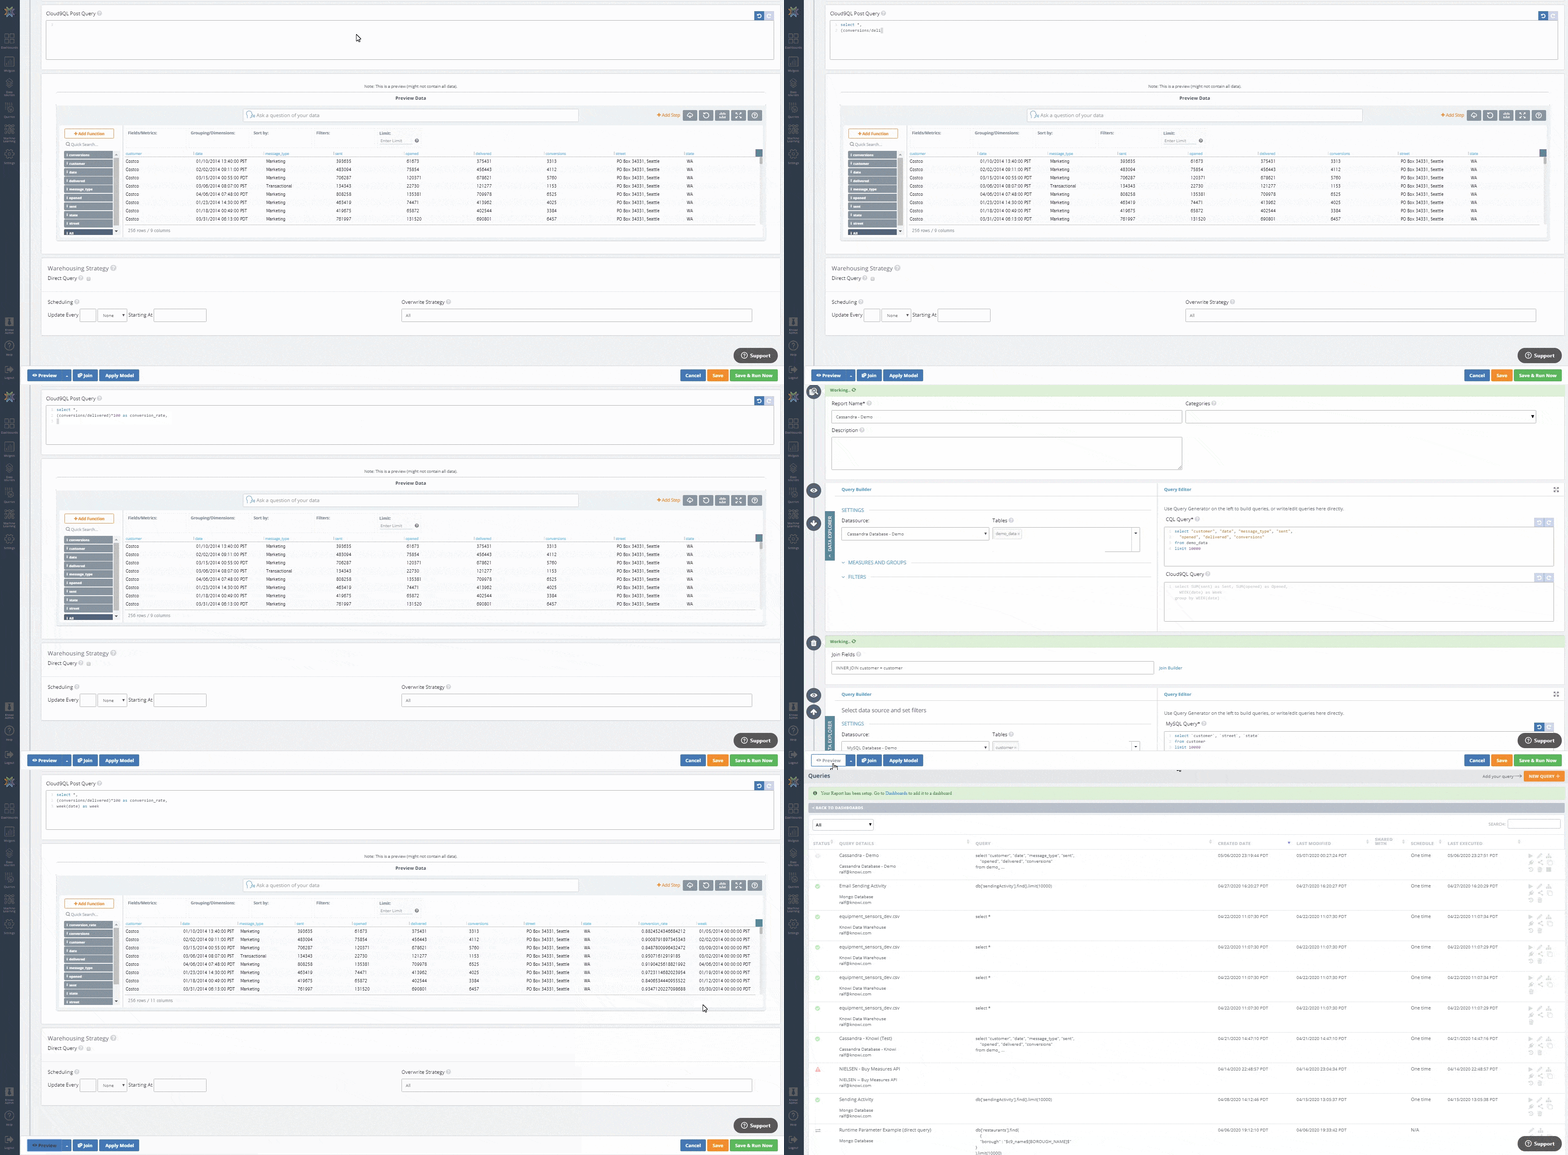
Below, we’ll use Cloud9QL to calculate the conversion rate of the email marketing campaign from the delivered and conversions fields. We’ll also apply a simple Cloud9QL date operator to extract the week value from the date field.
Steps:
- Navigate to the “Cloud9QL Post Query” text box at the bottom of the screen. This is where you’ll write your Cloud9QL queries
- Enter the syntax below:
- select *,
- (conversions/delivered)*100 as conversion_rate,
- week(date) as week
- Syntax breakdown:
- Selects all fields from the blended dataset
- Returns the conversion rate and creates a new field conversion_rate
- Uses the date operator week to extract the week value (Truncates to a date to the beginning of the week — Monday) and creates a new field week
- Click “Preview’ to view the updated results
- Once all changes have been made, Hit “Save & Run Now”
Creating Your First Visualization for Cassandra data
Once the query is saved, Knowi creates a “Virtual Dataset” from the query results and stores it in Knowi’s “Elastic Store” data warehouse that can store and track the results. Unlike traditional warehouses that require complex ETL processes and pre-defined schema, the elastic store is a flexible, scalable, schema-less warehouse. The stored virtual dataset is reusable, and will be the foundation for most of what you’ll do in Knowi, like creating visualizations, adding them to dashboards, and much more.
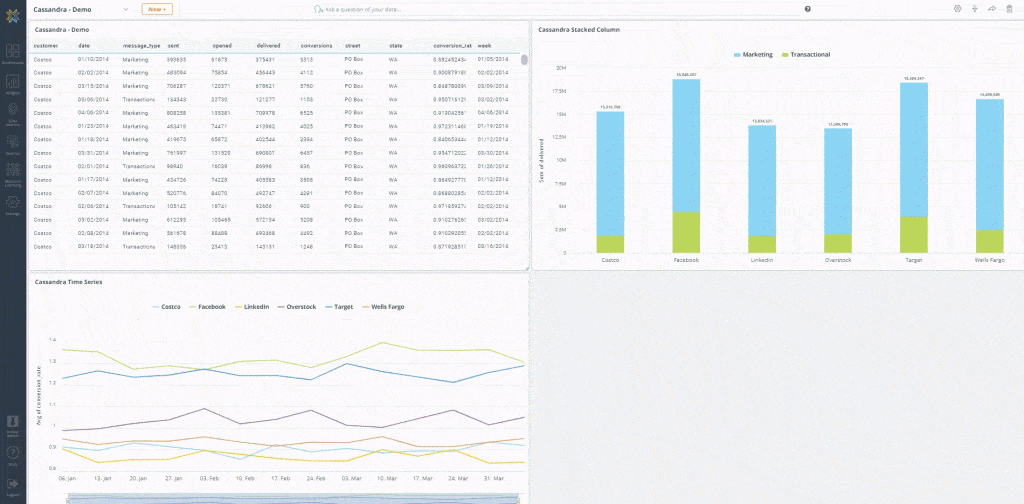
In this example, we will be creating a dashboard with 3 visualizations:
- A basic data grid with the full results of the original query
- A stacked column bar chart that shows the total delivered emails for each customer by message type
- A time-series line chart that compares the average conversion rate for each customer by week
See our transparent pricing.75% more affordable than traditional BI tools.
Creating A New Dashboard
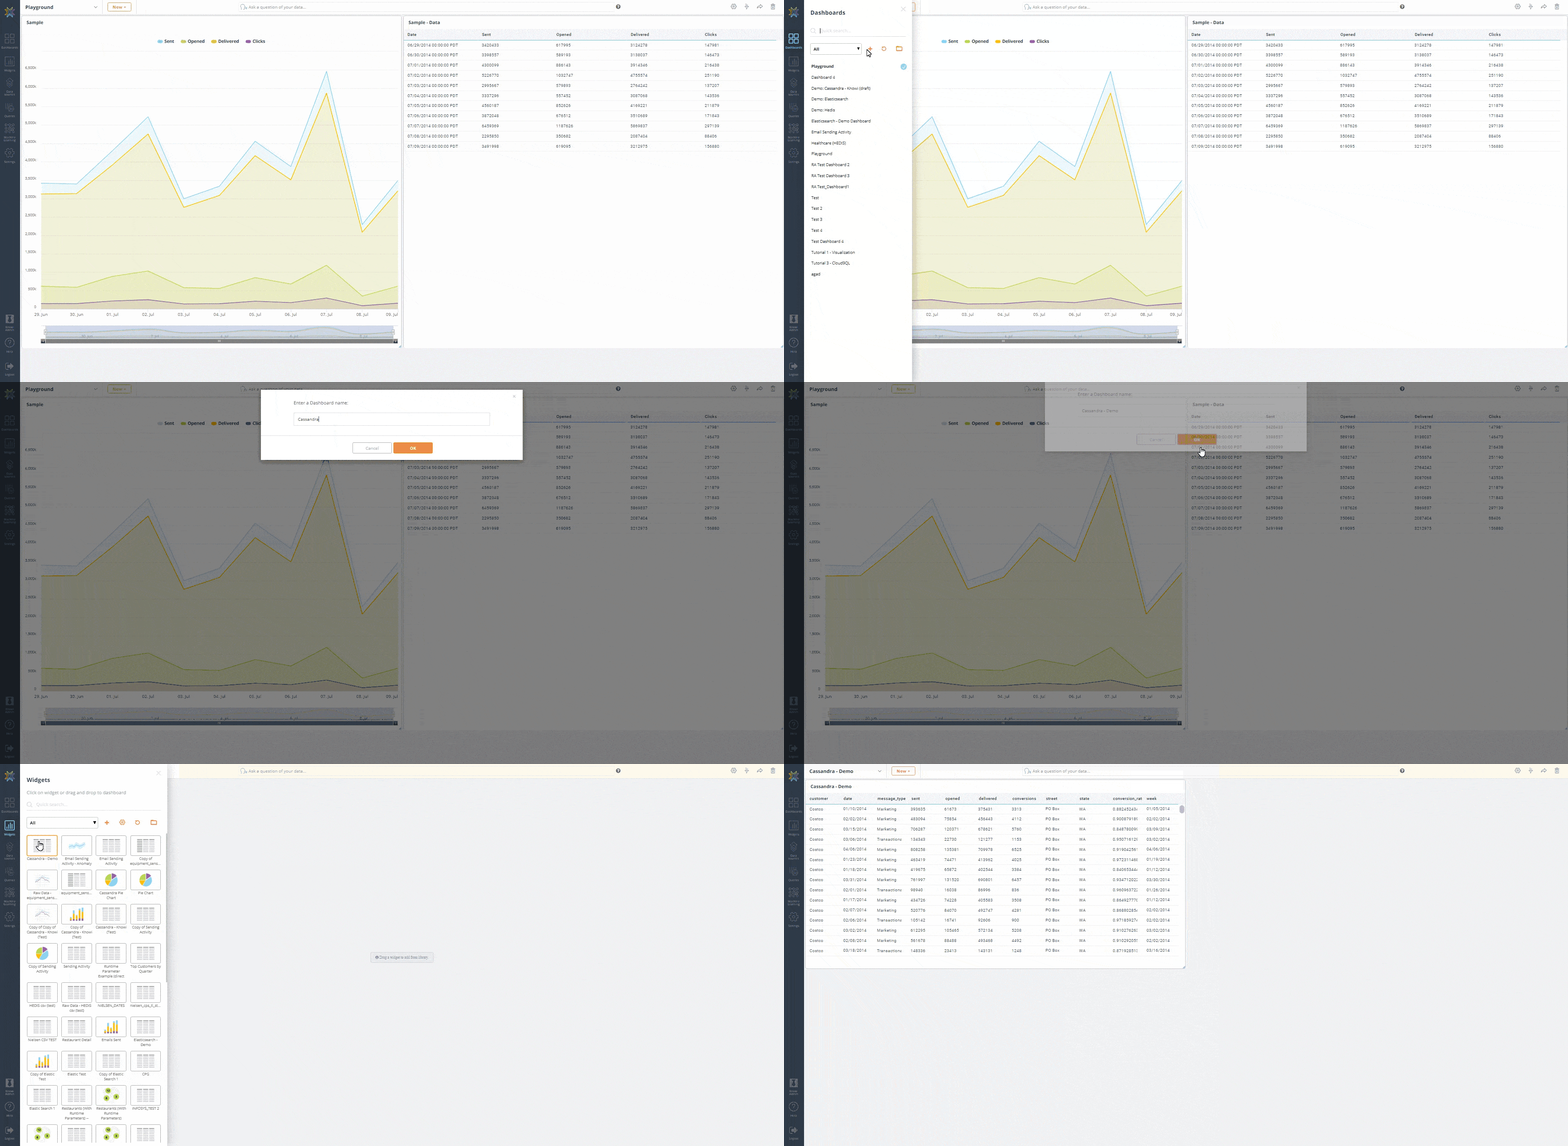
Steps:
- On the left side panel, click “Dashboards”
- Hit the “+” icon to create a new dashboard and give it a name then click “OK”
- Drag the widget/report from the query you previously created into the dashboard. By default, it will be in grid form
Creating A Stacked Column Chart
Steps:
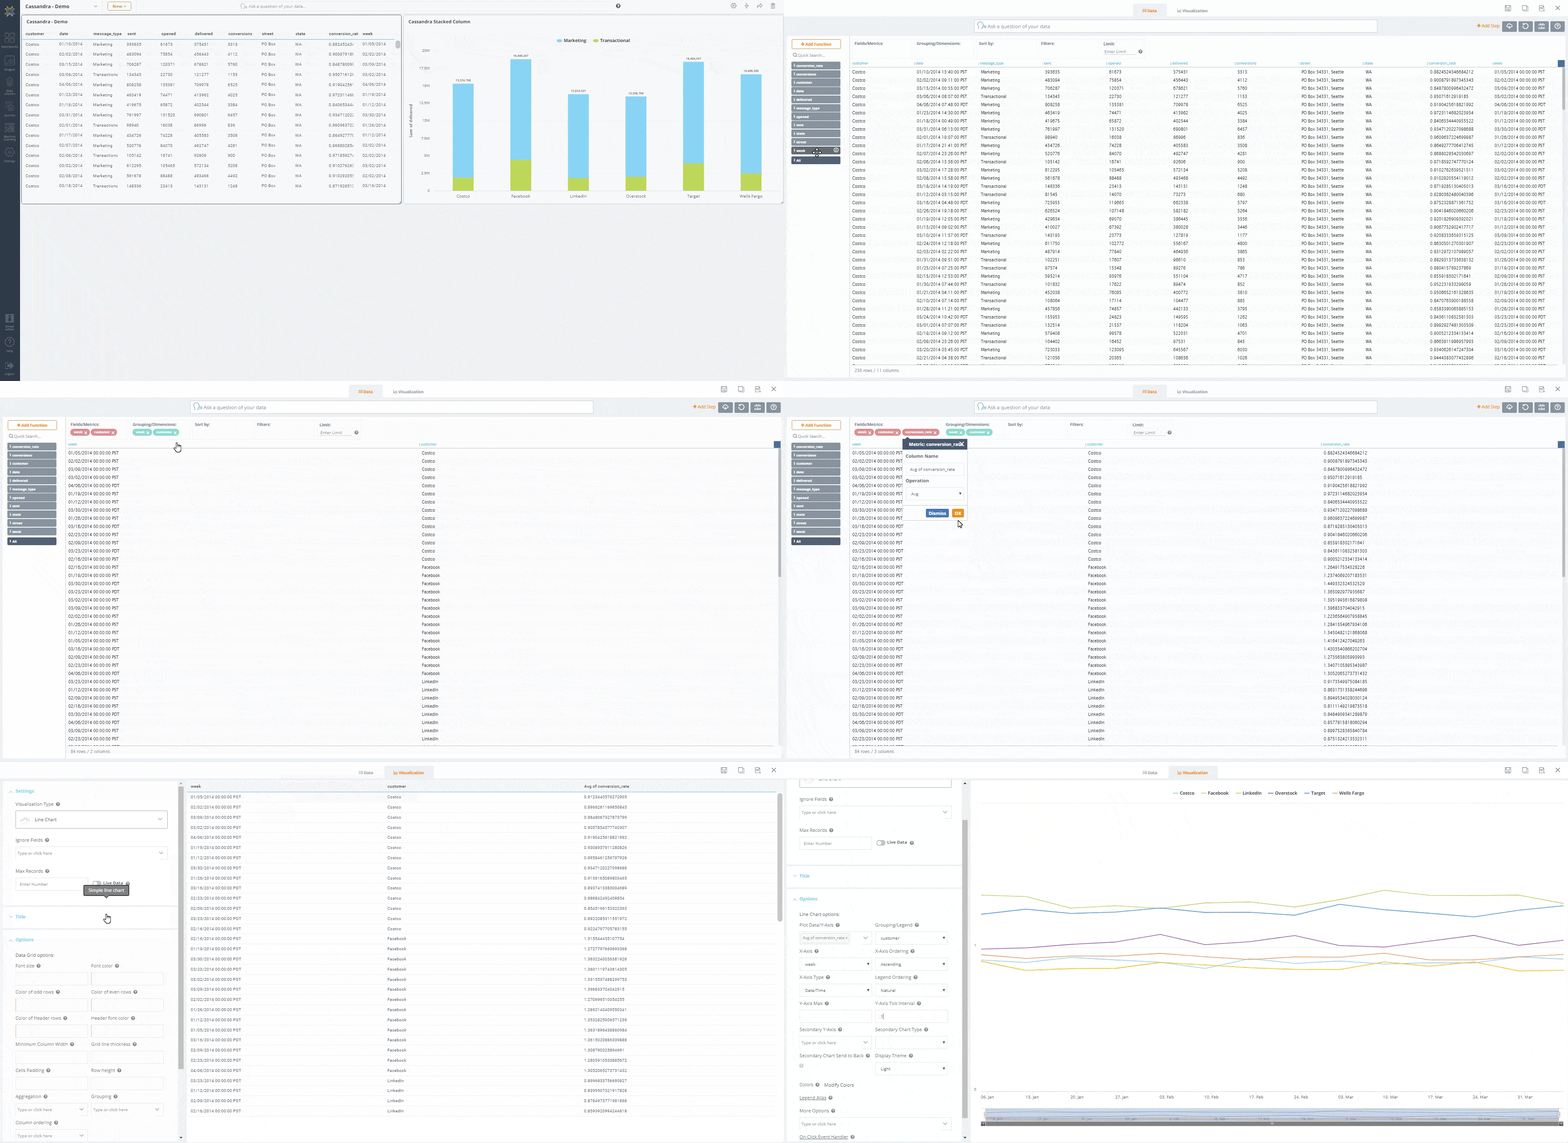
- On the top-right corner of the widget, click the “Natural Language/Self Service Analytics icon. This will take you to the Analyze screen
- Drag customer and message_type to the “Groupings/Dimensions” section
- Drag delivered to the “Fields/Metrics” section. In the “Operation” dropdown, select “Sum”
- At the top of the screen, click the “Visualization” tab. This takes you to the visualization settings screen. We want to create a stacked column chart with customer in the x-axis and sum of delivered in the y-axis
- In the “Settings” section under the “Visualization Type” dropdown, select “Stacked Column”
- In the “Options” section under the “Grouping/Legend” dropdown, select message_type
- Hit the “Clone” icon at the top right to create a new widget derived from the original data grid. This allows us to keep the original widget as is while having another version that we can freely change
- Give the cloned widget a name, then add it to the dashboard. You now have a new widget that visualizes the total emails delivered by message type for each customer
Creating A Time-Series Line Chart
Steps:
- Replicating the previous steps, go back to the Analyze screen of the data grid widget by clicking the “Natural Language/Self Service Analytics” icon
- Drag week and customer to the “Groupings/Dimensions” section
- Drag conversion_rate to the “Fields/Metrics” section. In the “Operation” dropdown, select “Avg”
- At the top of the screen, click the “Visualization” tab. This takes you to the visualization settings screen. We want to create a line chart with week in the x-axis and avg of conversion_rate in the y-axis
- In the “Settings” section under the “Visualization Type” dropdown, select “Line Chart”
- In the “Options” section under the “Grouping/Legend” dropdown, select customer
- In the “Y-Axis Tick Interval” text box, enter .10
- Hit the “Clone” icon at the top right to create a another widget derived from the original data grid
- Give the cloned widget a name, then add it to the dashboard. You now have another widget that visualizes the conversion rate trend for each customer by week

Adding Drilldowns
Drilldowns allow you to visually navigate and analyze data in powerful ways. They can be set into another widget, another dashboard, or the same dashboard. Drilldowns can be many levels deep with support for combining different drilldown modes. Data from the parent widget can be used as keys into the drilldown widget or dashboard to filter the data specifically for the point selected. Drilldowns can be configured using the ‘Drilldowns’ menu option on each widget in the dashboard.
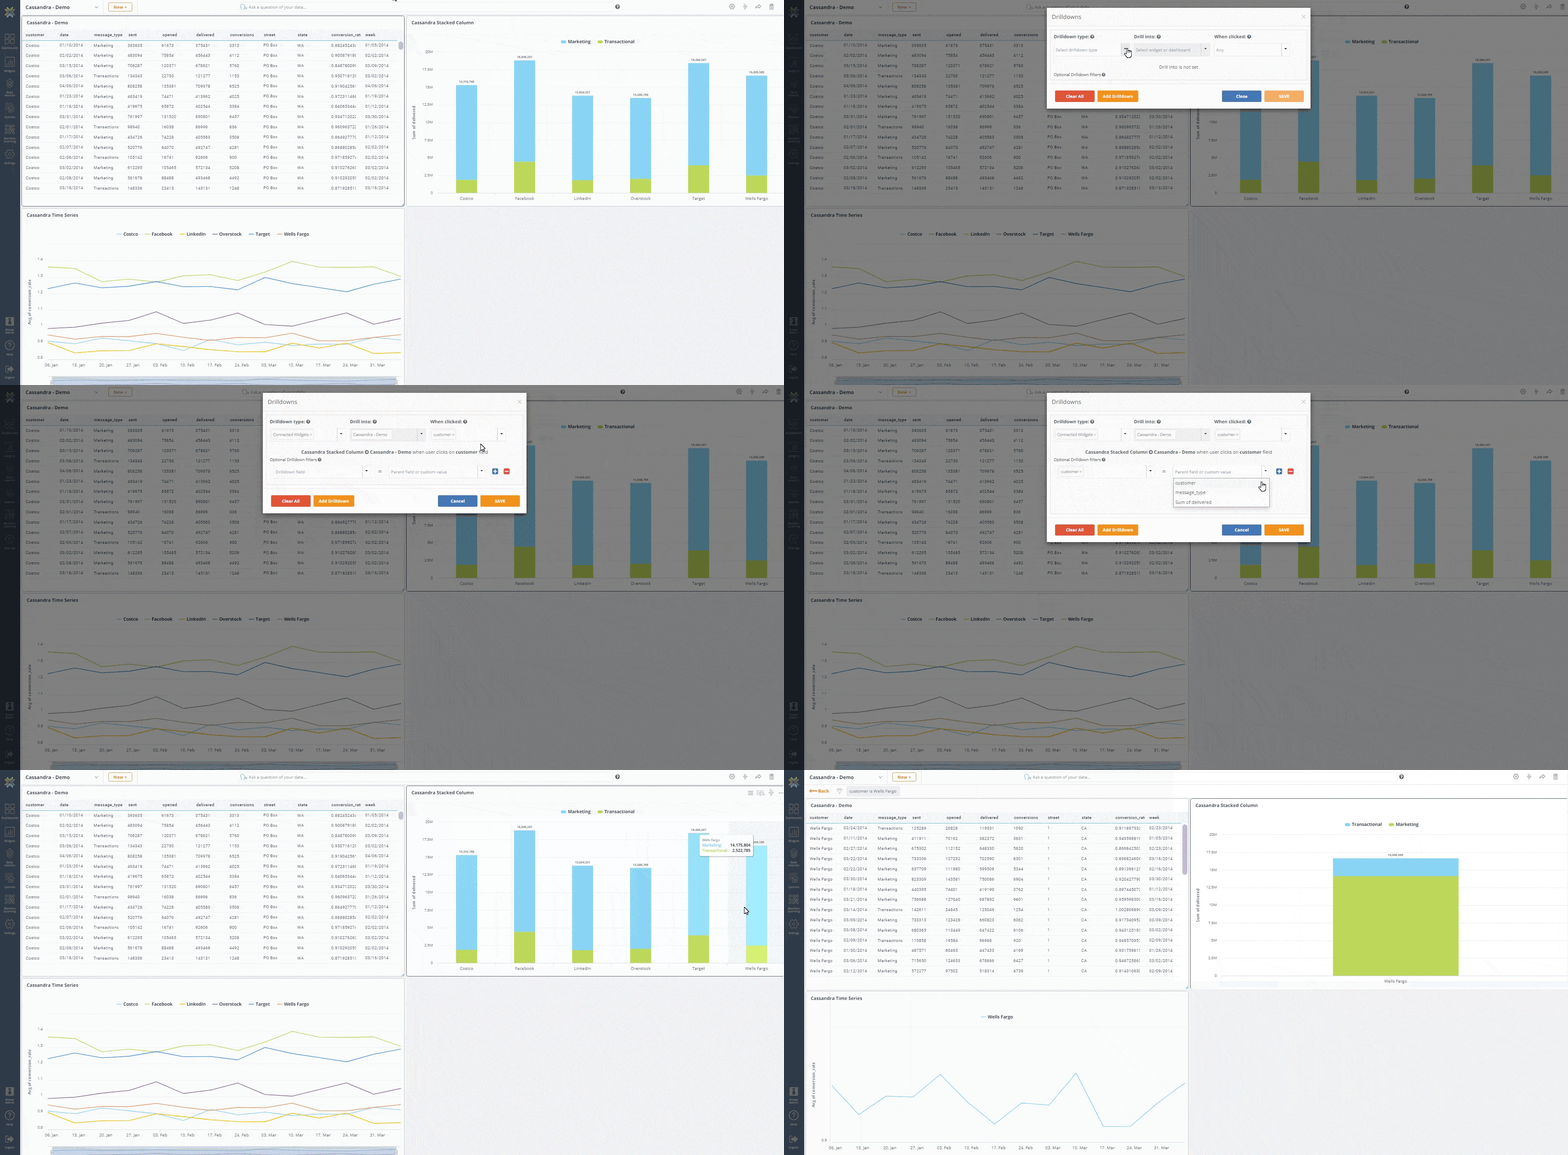
In this example, we’ll set up a “Connected Widgets” drilldown from the stacked column chart (Parent) widget that filters the data on the dashboard when you click on a specific customer.
Steps:
- On the top-right corner of the stacked column widget, click the ‘More Settings’ icon then select ‘Drilldowns’. The drilldown menu box will appear
- In the “Drilldown type” dropdown, select “Connected Widgets”
- In the “When clicked” dropdown, select customer
- For “Optional Drilldown Filters” select customer = customer
- Hit Save and Close
- Go to the stacked column chart widget and click on any of the bars representing each customer (i.e. Wells Fargo)
- This will filter all of the widgets on the dashboard based on the customer value “Wells Fargo”
- To return the dashboard to its default state, click the “Back” button on the top-left corner of the dashboard
Search-Based Analytics & Self-Service Analytics
Knowi’s Natural Language capabilities is a powerful way to enable self-service analytics to non-technical users, by asking questions in plain English to drive insights and visualizations quickly. This gives anyone the ability to make better, data-driven decisions, any time. The technology works by translating your natural language query to a Cloud9QL statement to resolve your request. This search-based analytics feature is available for use across all datasets and widgets within a dashboard. It can be accessed using the Natural Language/Self Serve Analytics icon on a widget.
Below, we’ll use this feature to ask a simple question from the data: What is the total number of emails sent for each customer? We will then create a brand new pie chart widget from the answer.
Steps:
- In the NLP text bar at the top of the dashboard, type “total sent by customer”
- Notice that as you type, Knowi makes auto-suggestions about the question you are asking
- When the results are returned, you can check to confirm that the “Sum” operation was performed on the sent field
- At the top of the screen, click the “Visualization” tab. You’ll see that Knowi already selected a pie chart as the default visualization. You may change it as needed
- Click “Create Widget”, give it a name, then click “+Create” and it to the dashboard
By simply typing in questions, you were able to instantly analyze and create a visualization from your data. You can try asking the questions below on your own to get a better feel for it.
Simple field selection:
"bounced, sent, customer"
"Show me all for Wells Fargo"
"bounced and sent for Wells Fargo"
Aggregations:
"Sum of sent sum of open by customer"
"Total sent by customer by week"
Dates:
"sum delivered weekly"
"average sent monthly"
"conversion rate by date by customer"
AI Analytics with Knowi
Knowi’s AI-powered analytics transforms Cassandra into an on-demand, context-aware analytics companion, helping you move from questions to answers in minutes, without complex setup or ETL.
- Conversational Analytics: Use Natural Language Querying (NLQ) to ask questions in plain English. Within your current session, the conversational interface keeps context, so you can refine queries, run follow-ups, and explore multi-step analyses without starting over.
- Instant Dashboard Generation: From a single query or dataset, Knowi can instantly create relevant dashboards with multiple visualizations, no manual configuration required.
- Proactive Monitoring & Alerts: Always-on monitoring detects anomalies in your Cassandra data and can trigger alerts or automated workflows, ensuring issues are caught in real time.
- Document-Aware Insights: Integrate unstructured content like contracts, PDFs, or reports with Cassandra datasets, and Knowi will extract, interpret, and correlate insights automatically.
- Connected Data Reasoning: Join and analyze data across Cassandra, SQL, NoSQL, APIs, and documents to create a complete view without manual stitching.
- Secure Private AI: AI runs on small, private language models hosted in your environment, keeping sensitive data fully within your control.
- Embedded Analytics: Deploy analytics directly inside your products or portals so end-users can query, visualize, and act on data without leaving their workflow.
By combining Cassandra’s scalability with Knowi’s context-aware querying, automated visualizations, proactive alerts, and secure AI processing, you get an analytics experience that feels collaborative, whether you’re building dashboards, joining sources, or drilling into anomalies.
Cassandra + Tableau or PowerBI? If you’re using Tableau or PowerBI, see why Knowi is a better for NoSQL databases.
Summary
In summary, we used Knowi to connect to your Cassandra (or Datastax) data source and query it using a dynamic query builder. We demonstrated how to blend data on the fly between Cassandra and a MySQL database, apply post-processing to the blended dataset with Cloud9QL, create multiple visualizations from the dataset, and use search-based analytics to ask questions and gain insights from the data instantly. Visit Knowi to learn more about how its analytics capabilities can leverage the strength of your Cassandra implementation.
Explore more about Cassandra
–Cassandra Deep Dive: Complete 2025 Guide (Architecture & Use Cases)
– Cassandra vs MongoDB: An in-Depth Comparison
– NoSQL Database Deep Dive: Challenges, Use Cases & Key Databases Explained
–Choosing th Best NoSQL Reporting Tools for Your Team: Here we compare top BI platforms for NoSQL
Frequently Asked Questions
What is Knowi’s advantage over traditional BI tools for Cassandra analytics?
Knowi connects natively to Apache Cassandra and DataStax Astra without the need for ODBC drivers, ETL pipelines, or intermediate warehouses. You can query Cassandra directly using CQL or a drag-and-drop Query Builder, blend it with other SQL/NoSQL/REST data, and visualize results instantly.
Do I need to move my Cassandra data into a separate warehouse before analyzing it in Knowi?
No. Knowi queries your Cassandra data in place, so there’s no need for data duplication, migration, or ETL processes.
Can I blend Cassandra data with data from other sources?
Yes. Knowi supports joins across 60+ SQL, NoSQL, and REST API sources. For example, you can join Cassandra data with MySQL, MongoDB, or Salesforce in a single query.
What query options are available for Cassandra in Knowi?
You can:
- Use the drag-and-drop Query Builder (no CQL knowledge required)
- Write CQL directly in the Query Editor
- Apply Cloud9QL for post-processing, calculations, and transformations
Does Knowi support Cassandra’s complex data types?
Yes. Knowi supports Cassandra’s native data types and collections, including list, map, and set, so you can work with your data as it exists in Cassandra.
How do visualizations work with Cassandra data in Knowi?
Once you run a query, Knowi creates a virtual dataset stored in its schema-less Elastic Store. You can create dashboards, stacked column charts, time-series charts, maps, and more, without predefined schema or complex setup.
Can I drill down into Cassandra dashboard data?
Yes. Knowi supports multi-level drilldowns, allowing you to click on a chart element and filter related widgets or dashboards based on the selected value.
Does Knowi offer natural language querying for Cassandra?
Yes. You can ask questions in plain English (e.g., “total sent by customer”), and Knowi will translate it into a query, return the results, and even suggest visualizations.
What AI features does Knowi offer for Cassandra analytics?
- Conversational analytics with context-aware follow-ups
- Instant dashboard generation from a single query
- Proactive anomaly detection and alerts
- Document-aware insights combining structured and unstructured data
- Secure private AI hosted in your environment
Is Knowi compatible with DataStax Astra?
Yes. Knowi integrates directly with DataStax Astra, allowing you to connect, query, and visualize your cloud-native Cassandra data just like on-prem deployments.
Can I embed Cassandra analytics into my own application?
Yes. Knowi offers embedded analytics, so you can provide interactive dashboards, visualizations, and search-based analytics to your end-users inside your product.
What’s the setup time to connect Cassandra to Knowi?
Most users can connect and run their first query in under 5 minutes, without installing any drivers.


